|
 |
|
Lesson 2 will focus on variables and explain what they are and what they do.
If you have any questions regarding the lessons then please post your question(s) on the forums.
In this lesson we will be using the Toolset, so create a new test module and paint a new area.
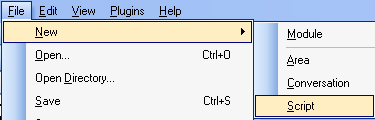
Lets create a new script. First thing we need to do is to click on File - New - Scripts. Or in the Areas node, click on the Scripts tab and then right click on a blank area and then left click on ADD.
We are now going to create a variable to hold the name of the NPCs dog.
There are 3 different types of variables:
int which is used just for numbers.
string which is used for alphanumeric (letters and numbers). Make sure the string is unique.
float which is used for decimal numbers.
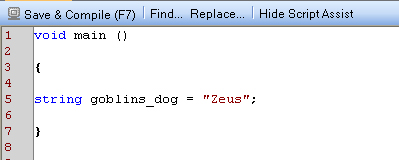
As you can see above I have typed in string as the variables name is just letters. goblins_dog is the name of the variable and note the underscore as Neverwinter Nights 2 does not like spaces in the name. The name of the tag is case sensitive and Zeus is the value of the variable.
You can see that I have used an equal�s sign between the name of the variable and the value of the variable. As the value of the variable is a string you have to enclose the value with quotes ��.
At the end of the line I have added the semi-colon (;), which indicates that the line is complete (so do not forget them at the end of every line).
So reading the above code, every time we use the goblin_dog variable, it will be replaced with the value of Zeus.
This is very handy and we can use the above information for an NPC to greet the player using their name or to remember that the Goblins Dog is called Zeus.
Basically we will create a Token that will use information that we do not know what the value will be in advanced. In this example go to the Functions list on the right and scroll till you see the SetCustomToken function. If you left click or select the function under notes, it will tell you how the toolset expects to see the line written (i.e. SetCustomToken(int nCustomTokenNumber, string sTokenValue);) ).
You can either type in the function or double click on it and the toolset will add the function for you. Complete the rest of the code like so:
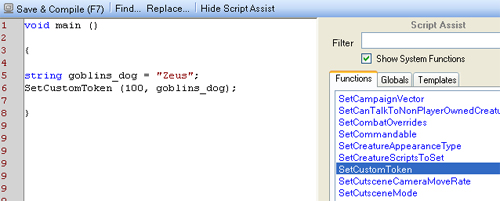
You give the Token some information and it does the rest for you. As you can see above we set the parameter at 100 and separated the next parameter (goblins_dog) by a comma and enclosed the lot in brackets. Again, do not forget the semi-colon at the end of the line.
Once done, click on the Save & Compile button or F7, which is the top left hand button to save and to check to make sure that the script is written correctly:

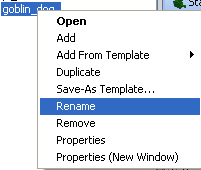
The Toolset will automatically name scripts such as "script1", "script2", etc, but you can right click on the script in the list and then left click on Rename:
Once saved go to the module properties (File, View, Module Properties) and then look for the On Module Load Script field under Scripts. Click on the downward arrow in the field and then look for your new script in the list. Select the script and you will now see the name of the script in the On Module Load Script line so that it will run each time the module is loaded.
Now we need to add an NPC to our module and then add a conversation to it. Create a new conversation for our NPC and enter a line such as Have you seen my dog .
When the conversation is fired will be replaced by the variable know as goblins_dog, which equals to Zeus (i.e. Have you seen my dog Zeus).
Variables are important, and are the only means of determining whether most events have taken place or of changing/keeping track of different story states.
|
|
|
 |
|
Affiliated Sites
|
|