| CREATING AN EQUIPPABLE ITEM - Armour
After creating a properly equippable weapon, there are only a few additional steps to be learned to create an armor set. Pitney's Militia Armor should provide a good introduction on how to spruce up a base armor model with a few appropriate attachments, and an additional feat and spell bonus. To create a set of armor, follow the same steps as creating a standard equippable item: create the blueprint, set the item name and resrefs, and set the Base Item to "Armor." Once the Base Item has been set to "Armor," set the Armor Type field to the desired style of armor (in this case, Pitney is a simple village militiaman, so Padded armor should work nicely). When the Armor Type is set, you will see the ArmorRulesInfo field below (in gray) update to reflect the rules for that particular armor type. 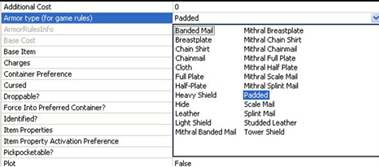

Once the Armor Type has been set, select the "Armor Set" tab on the far right of the blueprint menu - this will help you to set the actual appearance of the armor itself [Note: the model for the Armor Set tool is a human male: while the majority of the base armor models are identical in appearance across race and gender, some armors may appear different on some race/gender combinations] 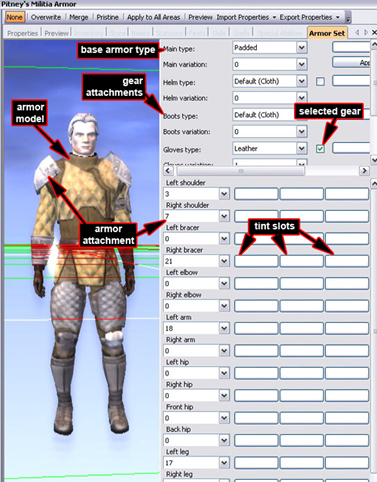
As with the Preview window, navigation within the Armor Set window is controlled with a combination of the middle mouse button and the Ctrl key: the mouse scroll controls zoom, Ctrl-middle -click rotates the model, and middle -click-drag moves the model. It is important to note that when using the Armor Set tool that one should turn OFF the Preview option along the top bar of the window: the Armor Set tool will be useable either way, but turning off the Preview option prevents armor flickering within the Armor Set tool when the Preview window loads an updated model. 
The first thing to do when creating an armor within the Armor Set window is to set the base appearance of the model, which is listed under the Main Type (which controls the armor appearance type) and Main Variation (selects model variation within the main type) menus. The two armors below are both scale mail, for example, but use different variations. 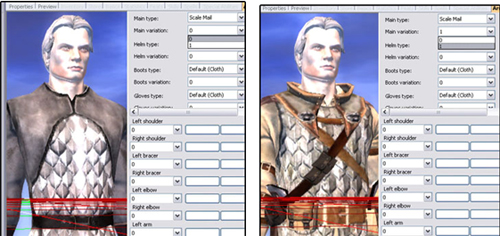
Advanced Topic: Untraditional Armors It is possible for the armor appearance and the Armor Type (from the "Properties" tab) to be set differently, so one could have armor that looked like cloth but had the properties of Full Plate mail, and vice versa. This is an option for armor creation, but moreover something to be aware of when creating armor. For the purposes of the example, select the "Padded" armor from the Main Type menu in the "Armor Set" tab, and select variation 0 for the set. The second step of creating armor is to decide on the armor attachments. On the bottom right of the Armor Set tab is a scrolling menu listing each armor attachment slot, which allows the user to pick what armor attachment they would like to put in what location [Note: as per the note above, armor appearance and Armor Type are not inherently linked, so it is possible to use any attachment on any base armor without influencing its stats.] To place an attachment, scroll to the desired attachment location (such as "Left leg"), open up the Dropdown Menu (which lists the models available for that attachment slot), and select the desired attachment. 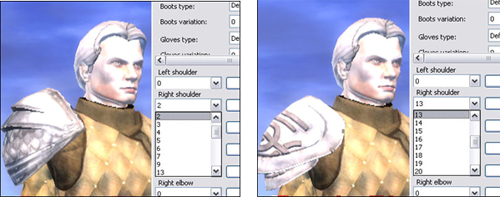
For Pitney's armor, since it's a bit fancier than the armor of the other militiamen, he's been given burly leather shoulderpads (Left shoulder: 7, Right shoulder: 3), mismatched arm and knee attachments from wear-and-tear (Right bracer: 21, Left arm: 18, Left Knee: 3, Right Knee: 4), and matched legwear to protect his thighs (Left & Right Leg: 17). 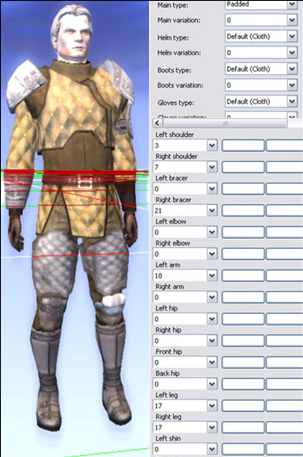
After the basic armor attachments have been set, you can apply gear attachments as well. Gear attachments are items that are not directly attached to the armor itself: helms, belts, gloves, cloaks, and boots. Gear attachments are located directly beneath the Main type armor setting, and are handled in an identical fashion. In the example, to equip the given armor set with leather gloves, scroll down in the menu to the Gloves Type menu, click the check-box next to the menu to turn on the gear attachment, select "Leather," and set the desired variation (model #3). Using this same method for the other attachments, you can easily set the armor set to have a very unique and distinctive look with no hassle. 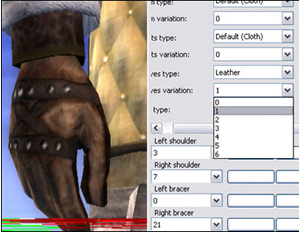
After all of the attachments have been set, you can begin tinting the armor. Next to each armor piece - main, attachment, and base - there are three squares that control the tint color for each piece of armor, in order of importance (first color covers the bulk of the item, with the second and third colors as the secondary and tertiary details). When setting a tint, click on a tint button and select a color within the Color Edit Form (which is identical to the one used to set weapon tints). Although the base armor is only able to take the latter two tints listed, it is possible to set three tints on it temporarily: this is done in order to take advantage of the "Apply To All" button that sits immediately below the main armor tint buttons. The "Apply To All" button automatically migrates the color settings of the base armor to all of the armor attachments so that they do not need to be set individually (but they can be if desired). For Pitney's armor, if the main colors are set to be (in order of appearance) Pale Warm Brown, Darker Yellow Orange, and Dark Yellow Orange, only the second two tints will actually appear on the base armor, but pressing the "Apply to All" button will set all of the armor attachments to those same settings. [Note: gear attachments are not included in this change; they are tinted individually.] The below examples show a screenshot previous to pressing the "Apply to All" button (left picture), and after (right picture): you can see that the base armor tints featured at the top have been migrated to the attachments, and are showing up on the model. 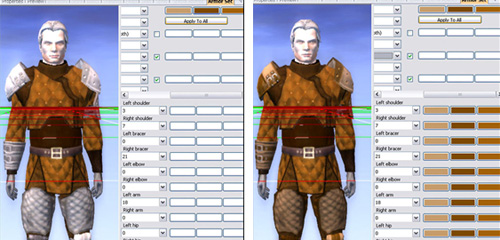
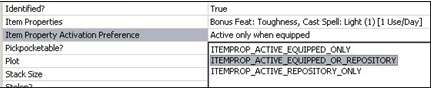
Once all of the attachments and gear are set and properly tinted, return to the "Properties" tab to finish up the item: setting the icon used (it_al_padded04 for the example), the material type (since the example armor is padded, it should be kept as "Non-Specific"), other desired property tweaks, and setting the Item Properties. In terms of the example: Pitney once won a bet with Tarmas, so the local wizard grudgingly enchanted the item with a pair of smaller spells - the Item Properties should be set up to reflect this. Open up the Item Properties menu, open up the "Bonus Feat" selection in the Available Properties menu, and select the "Toughness" feat - this is one of many available feats that can be included on an item for a character to take advantage of. In addition to this, scroll down to the "Cast Spell" selection in the menu, select the "Light" spell, and set the Cost Value to 1 Use/Day. If the player wants to use this spell, they can equip the armor, and right-click on the armor in their inventory to bring up the menu to cast the spell - or use the Item Property Activation Preference to set the item's magical properties to be usable even when the item is unequipped. 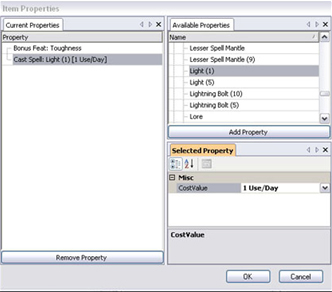
Once the properties of the armor have been set, save the changes made - and the armor should be ready to be placed into a module and used.
|