| CREATING AN EQUIPPABLE ITEM - WEAPONS
Now that an unequippable item has been created for the module, it is time to create a pair of suitable equippable items: a weapon and an armor. In terms of weapons, it just so happens that Pitney Lannon is in possession of a quality club perfect for harassing pesky lizardfolk: he may lack the courage to use it himself, but this hardly prevents him from passing it on to an enterprising young soul who might make better use of it.
To craft a weapon (Lannon's Reptile Bane Cudgel in this example), follow the usual instructions to create a new module-specific item (right-click on "Items," Create Blueprint -> Module). As with creating an unequippable item, set the item name and resref first. Once the name and resref have been set, go to the Base Item field and select an equippable item type from the list ("Club" in this case). Since the Club base item is a weapon, now there will be an actual model available to select [Note: this is the case with most equippable items, but not all - bracers, rods, wands, and jewelry do not have visible models set for them]. Move up to the Appearance area and set the desired model number in the Model Part fields: different base items have a different number of available models and model types, and some have interchangeable model types (swapping out different hilts, blades, and pommels on swords, for example). To find out what model (or combination of models) looks ideal, it is a good idea to change the Model Part values one at a time and swap between the "Properties" and "Preview" tabs to see how the item changes [Note: if a black question-marked cube appears in the Preview window, that is because there is no model set for the given model number]. For the Reptile Bane Cudgel example, type in "2" in the first Model Part field - this will select the second available club model (the metal one). You will be able to check the model by clicking the "Preview" tab at the top of the window, and navigating through the window by using the mouse scroll button to zoom, Ctrl+right-click to move the model around, and Ctrl+middle-button-click to tilt the camera [Note: the "Preview" option on the top bar must be selected, or no model will appear in the Preview window]
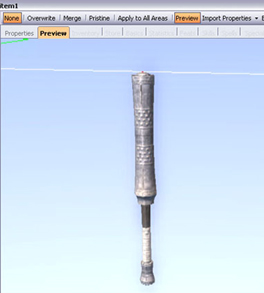
Once the club appears correctly, open up the Tint mini-menu in the Appearance area. Three set tints will appear - click on one to bring up the Color Edit Form 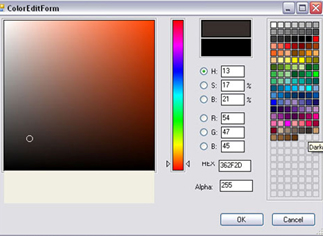
The Color Edit Form sets the individual tints on a model, either by selecting a color by hand from the palette on the left, or by selecting a named swatch on the right (the names of each swatch appear when the mouse cursor is hovered over each swatch). It's often helpful to set the tint values initially to very bright colors (like pure red, green, or blue) so that it is very obvious between switching from the "Properties" tab to the "Preview" tab which tint is connected to what part of the model. In the case of the club model 2, the Model Tint 1 controls the main body of the club, the second tint controls the color of the handle, and the third tint governs the color of the wrapping. For this example, swatches will be used to select the colors of the Reptile Bane Cudgel: Darker Cool Brown for Tint 1, Medium Cool Brown for Tint 2, and Darker Pea Green for Tint 3. Once the tints are set, check the Preview window to see how it looks. 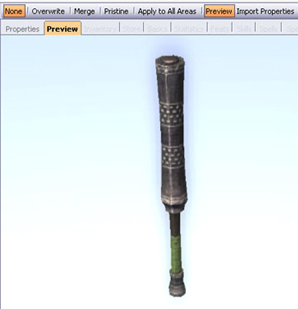
Once the appearance of the club is set, follow the same sequence of events to finish up the item as on an unequippable item - setting the icon (it_wu_clubpoison), writing up a description, and setting a proper set of Item Properties. 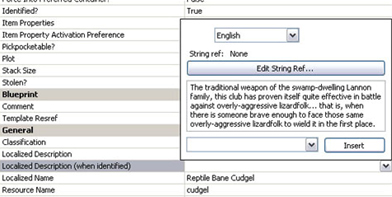
For the Reptile Bane Cudgel, it is important for the weapon to have a proper bonus against Reptiles to suit its name. Click on the Item Properties field and select the "Attack Bonus vs. Racial Group" ability, scroll down and select "Reptilian" from the list, and change the Cost Value of the ability to +3. To strengthen the weapon a bit more, scroll down to "Enhancement Bonus" and add that property as well, setting the Cost Value to +1. [Note: you can add numerous additional properties to items in this same fashion]. 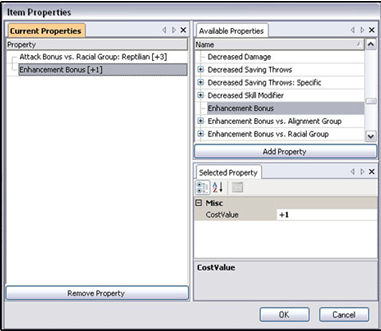
Once the Item Properties are set, scroll down to the Statistics section and set the Material field to "Metal (Iron)": while not terribly critical for this particular weapon, it's good practice to set the value for every weapon, in case one wishes to make an item out of a different material. Certain materials are set to give specialized effects, such as Cold Iron (effective against demons) or Darksteel (deals an additional +1 electricity damage), and can be a valuable addition to many types of items. 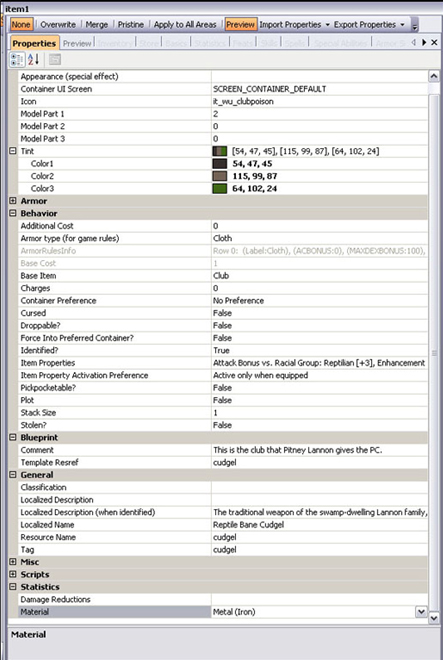
Once this field is set, the weapon should be ready for use.
|