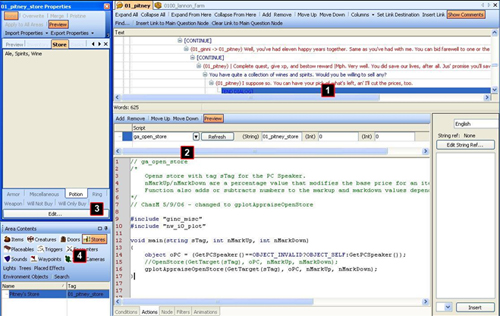
| Stores Stores are only accessed through script in a conversation - they are not objects that the player can detect. Stores have blueprints just like other types of objects. After you create your store's blueprint, place it on the map normally. It is generally best to place your store next to the NPC. 
2. Script ga_open_store. This action opens your store. It is given the store's tag as a parameter.
3. Store Properties Panel. To edit the contents of your store (and to initially assign its tag), open its Property Panel. Click on the "Store" tab, then click the "Edit" button to change its contents. You can them place instances of any blueprint item into your store.
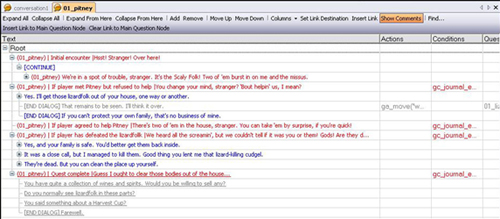
4. Area Contents. All stores in an area can be seen here under the "Store" tab. Fall-through Fall-through is a term for creating multiple NPC nodes and assigning conditions so that, if the first node can't be displayed, the process 'falls through' to the next red NPC node down the line. As mentioned earlier in our discussion of conditions and actions, a node can be given a condition and if that condition is FALSE, the line will not be displayed. Observe Pitney Lannon's conversation: 
Notice how there are 5 red NPC nodes off of the root (indicated by the vertical line dropping down from the word Root). The first red NPC node that is TRUE is displayed, and the conversation follows the nodes under it - the other nodes are effectively ignored. Here, the author has used comments in pipes to indicate when and why each red NPC node is used. When first speaking with Pitney, the first red line fires. Next time in the dialogue, the game checks to see if the player refused to help and if so, it plays the second red line, otherwise, it checks to see if he's agreed to help. and so on. As you experiment more with conditions, you can use fall-through to create very powerful, reactive conversations. The player may feel like it's five completely different dialogues, all custom-tailored to what events took place already when really, it's just one conversation using fall-through to create a smart dialogue. 
One-time-only Nodes You may occasionally want an NPC to speak a line once and never repeat it again. For example, in the Sample Module, Pitney's initial conversation (in which he tells the player about his problem and begs for help) occurs only once. After this, Pitney will respond based upon the player's quest state. This is to create the illusion that Pitney knows and remembers the PC. To set a dialog node as one-time-only, click the node in the Dialog Editor, and select the "Node" tab in the Node Properties window (at the bottom of the screen). Click the "Show Once" field, and you will be able to select from a drop-down menu. The "Show Once" field defaults to "Always," which means that the node will always appear, unless Conditions dictate otherwise. 
Set the "Show Once" tab to "Once per game" to ensure that the node will only be called once, and will never appear again. Be certain that a fall-through node follows the once-only node, however, or the conversation will simply close.
For Persistent Worlds, it may be wiser to set the "Show Once" field to "Once per creature that uses this conversation." Otherwise, the node will be displayed for the first player who views the dialog, but will never appear again!
|


