Once the plugin is loaded by the toolset it has access to the public classes and interfaces of the toolset itself. The ability to reuse the same classes and data that the toolset uses is very powerful. In addition to the classes the UI elements of the toolset are also available. There are very few limits to the types of features that can be added to the toolset with plugins. A plugin could be used to add a new wizard for area or module creation, global search and replace options, and even adding a scripting language like LUA are possible. Keep in mind that the plugin will have no effect on client or server itself. It can only assist in the creation of modules or campaigns. If you wish to add database support for persistent worlds then nwscript in the client would be required. You could use a plugin though to add database support for placeables, creatures, etc. to the toolset. CREATING YOUR FIRST PLUGIN I have included the Word document that the author created as it would be easier to copy the code that he has used here The Neverwinter Nights 2 toolset was written using managed code in Visual Studio. When the toolset is run it looks in the Plugin directory for any .dll files and loads them (as long as the Allow Plugins option is set to Allow all plugins). Once the .dll is loaded by the toolset it calls specific methods in the .dll. This howto will assume that you are experienced with the Visual Studio development environment as well as the C# language. The first step in creating a plugin is to start a new project in Visual Studio to create a C# class library. You can download Visual Studio Express for free from Microsoft at: http://msdn.microsoft.com/vstudio/express 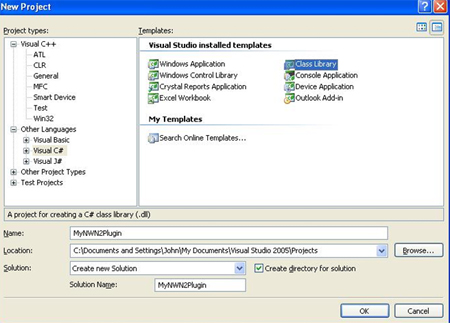
Once the project has been created open up the project .cs file and look for the pregenerated code. 
First you need to add the following to the beginning of the file: 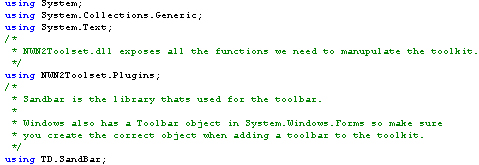
You may need to browse into the NWN2 directory to locate the NWN2Toolset.dll file. You will need to add a few new methods into the class that will be called by the toolset during initialization: 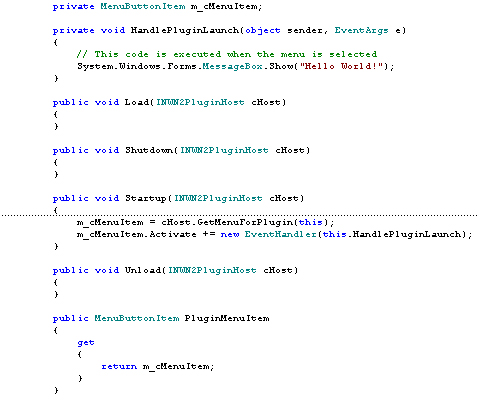
The Load and Unload methods are called when the toolset is initially started and exited. The Startup and Shutdown methods will be called when the Plugins menu item for your plugin is selected. You will also need to add a few properties to your close to identify the plugin to the toolset: 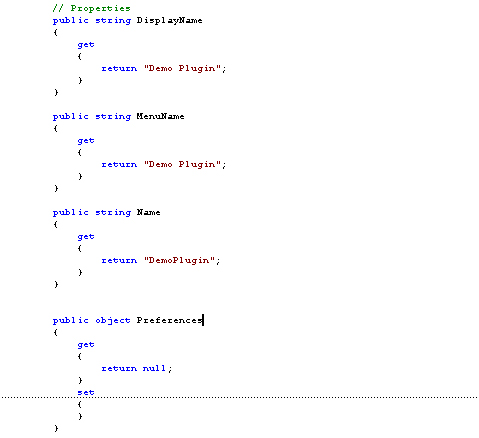
Once you add these lines to your class, you need to add references to the NWN2 assemblies to your project. This only needs to be done once. To do this use the Project -> Add Reference menu item and select the Browse tab. Then navigate to your folder where NWN2 is located and enter NWN2Toolset.dll. Repeat this process for the SandBar.dll and OEIShared.dll files in the NWN2 folder. You should also use the .NET tab to add the System.Windows.Forms assembly. Once this is completed you can compile your new DLL and place it into the Plugins directory. You will now have a new menu item "Demo Plugin" (from the DisplayName property) in the Plugins menu after you restart the toolset. When the user selects the menu item the message "Hello World!" will be displayed. Congratulations! You've just created your first plugin! ADDING A TOOLBAR FOR YOU PLUGIN If you would like to add a toolbar to the toolset UI you will need to add a variable to hold the toolbar to your class: 
You can then update the Startup method to call the code to create a menu 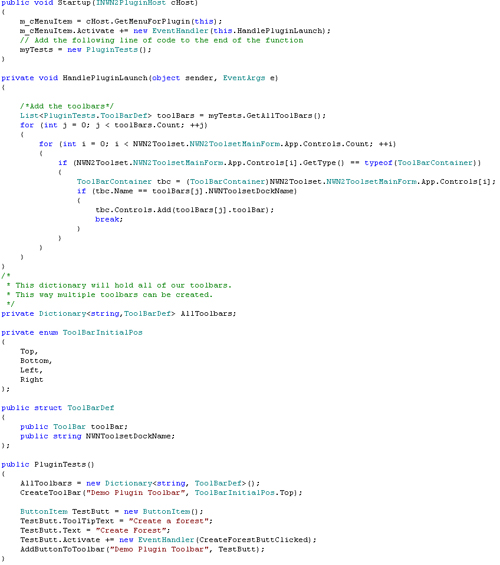
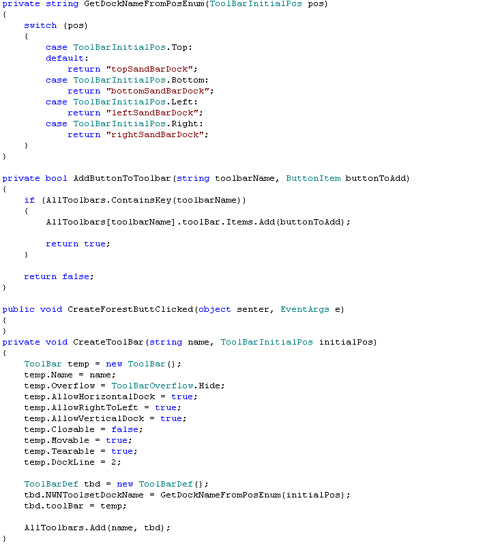
There is quite a bit of code in the previous section. The code in the Startup method is called when you select the menu item. It calls HandlePluginLaunch that calls PluginTests. Finally, the CreateForestButtClicked method will be called whenever the "Create Forest" button in pressed in the UI. TOOLSET PUBLIC CLASSES YYour plugin will interact with the toolset via the public classes that are exposed by the NWN2Toolset.dll file. There are many classes that are available; this section will describe the major classes that will commonly be accessed by a plugin. How you will access these classes will be determined by the programming language (C#, VB.net, LUA) that you are using. There are many classes that are available in the NWN2 toolset, this guide will only describe a few of the most important. It is recommended that you use a .NET examination tool (like Lutz Roeder's .NET Reflector) to examine all of the classes that are available in all of the toolset files. You can download the .NET Reflector from http://www.aisto.com/roeder/dotnet. 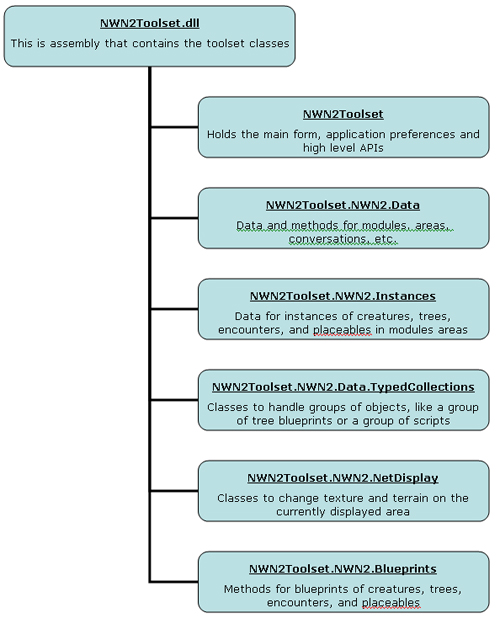
Each of these classes will be described in more detail in the sections below. NWN2Toolset Class This class is used to set global preferences, compile and bake modules, and access information about the currently open module or view. A few of the important members are:
NWN2ToolsetMainForm: This is class for the main form of the toolset application. This form will contain all of the windows, toolbars, menus for the toolset.
App: This is the current instance of NWN2ToolsetMainForm. This should be referenced to access the members of NWN2ToolsetMainForm.
Module: This returns the NWNGameModule instance for the currently loaded module. This should be used to modify the contents of a module.
AreaContents: Returns a NWN2AreaContentsView instance for the currently displayed area. This can be used to modify terrain, texture, or tiles of an area.
Controls: A collection of the controls owned by the main form such as toolbars.
Bake: This method will make the currently open module.
NWN2ToolsetGeneralPreferences: One of many the classes (NWN2ToolsetConversationPreferences, NWN2ToolsetGraphicsPreferences, etc) that handle the View - Options information.
NWN2Toolset.NWN2.Data Class This class contains methods to manipulate the information for the currently opened module. It contains classes to handle areas, scripts, and conversations.
NWN2GameModule: This is normally accessed via NWN2Toolset.App.Module. Holds all of the information about the currently load module.
Areas: A list of all of the areas in the module (stored as a Dictionary).
Conversations: A dictionary list of all of the conversations in the module.
Creatures: This (along with Doors, Trees, etc.) hold the Module (not Global) blueprints for each of the types of instances.
Scripts: A list of all of the scripts in the module.
Name: The name of the module.
FileName: The full pathname of the module (if it has been saved/opened).
NWN2GameArea: The currently display area can be found via NWN2Toolset.NWN2ToolsetMainForm.App.AreaContents.Area or any area can be accessed by enumerating NWN2Toolset.NWN2ToolsetMainForm.App.Module.Areas. This class holds information for one area (either interior or exterior).
Creatures, Placeables, Trees, Lights, Sounds, etc.: These classes hold a list of all of the instances of these types in the area.
Add: This method will add a new instance to the area. This new instance can be obtained by calling CreateFromBlueprint in one of the instances classes such as NWN2Toolset.NWN2.Data.Instances.NWN2TreeInstance.
GetBoundsofArea: Returns a BoundingBox3 type that holds the size of the area with the Height and Length set. Each large tile in the area (including the non-usable outer tiles) are 80 units. So a 8x10 outdoor area would return Height=640 and Length=800.
Name: The name of the area.
HasTerrain, Interior, Underground: These indicate the type of area.
NWN2GameAreaTileData: ????
NWN2TOOLSET.NWN2.INSTANCES This class holds information the the individual instances of items that are placed into an area. Each of the types of instances has it's own class. The classes are: NWN2CreatureInstance, NWN2DoorInstance, NWN2EncounterInstance, NWN2EnvironmentInstance, NWN2ItemInstance, NWN2LightInstance, NWN2PlaceableInstance, NWN2TreeInstance, NWN2SoundInstance, NWN2StaticCameraInstance, NWN2StoreInstance, NWN2TriggerInstance, and NWN2WaypointInstance. Each of these instances allow direct access to the information for that instances (such as Tint for creatures, or Seed for trees). The following methods are common to the Instance classes.
CreateFromBluePrint: When this method is passed a blueprint as the parameter a new instance will be created using the blueprints information.
GetDifferencesFromBluePrint: Returns an array with the list of differences between the instance and the passed in blueprint.
Area: The area (via NWN2GameArea) this instance is in.
ObjectID: The GUID (globally unique identifier) for this instance. This can be useful for searching for a specific instance.
Position: The location of the instance in the area (as a DirectX Vector3 type). This uses the same units as the GetBoundsofArea where 80 units represents on large tile in the outdoor area.
NWN2TOOLSET.NWN2.DATA.TYPEDCOLLECTIONS
NWN2ConditionalFunctorCollection
NWN2GameAreaTileDataCollection
NWN2GameConversationDictionary
NWN2TOOLSET.NWN2.NETDISPLAY This class handles the display of information to the windows in the toolset. This includes methods to modify information in those windows. This class can be used to modify terrain and texture information in outdoor areas.
NWN2NetDisplayManager.Instance: The current instance of the toolset's NWN2NetDisplayManager class. You should reference the display members through this.
BeginSynchronizedOperation: This should be called before a group of changes are made to one of the displayes.
EndSynchronizedOperation: This is the corresponding call that should be called after a group of changes have been made to a display window.
TerrainModify: This method can be used to modify the height of terrain in an outside area.
NWN2TOOLSET.NWN2.BLUEPRINTS The blueprint collections are very similar to the Instance collection with the same list of classes with the Blueprint suffix replacing the Instance suffix. The module blueprints are located in the Module To get a list of Module blueprints for trees you can reference NWN2Toolset.NWN2ToolsetMainForm.App.Module.Trees. The common method of these classes is:
BlueprintLocation: Returns a NWN2BlueprintLocationType that indicates if the blueprint is global, module, or campaign.
CHANGING ITEM DATA FROM A PLUGIN The following code demonstrates how you can access information that is in currently displayed area and make changes to items. In this example, we will be changing the random seed value of all of the trees that are in the currently displayed area. 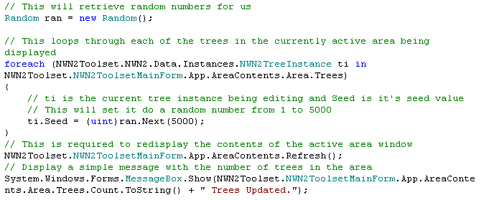
As you can see from this example, getting access to information in the currently active area (in this case an outdoor area) is quite easy. Keep in mind that this code does not have any of the normal error checking (is any area being displayed, is a module loaded, etc.). CONCLUSION The Neverwinter Nights 2 toolset has extremely powerful capabilities for building and creating beautiful worlds and environments. It can be extended by writing and using plugins to the toolset. The plugins can access much of the internal information about the modules and toolset UI. It may take considerable programming experience and time to create your own plugin, but the improvements to the toolset can save time for all module developers.
|


