|
 |
|
| How to make cut scenes by Montgomery Markland of Rogue Dao Studios |
An overview of setting up a cinematic-style cutscene conversation
What you will need:
1) A conversation
2) A blocking script
3) A way to begin your cutscene (either a speak trigger, an on_client_enter script or something else)
4) Plus the area, npcs etc., etc., etc.
Scene Overview:
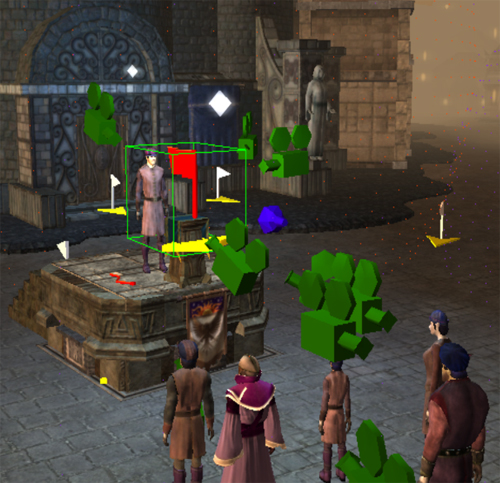
This is what a cutscene might look somewhat like, once it is setup in the area.
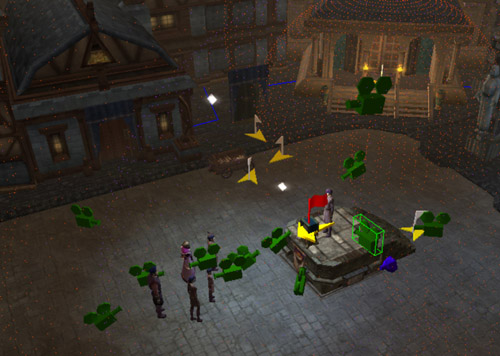
This particular cutscene uses a lot of different camera angles with static cameras, but you do not necessarily need to use any static cameras for a given cutscene.
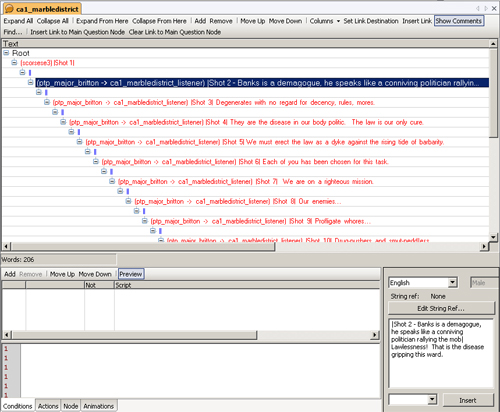
Conversation Editor
In this particular image, you'll see that there are no PC nodes for the conversation.
They are all simply: "||"
In this case, the cutscene involves the PC watching an NPC through a series of shots speaking to a crowd. And the PC does not get involved till later in the scene. A blank PC node will get skipped, at least visually, in the flow of the cutscene. Though you can add blank PC nodes and put a delay on them to create a duration shot on the PC without any option to choose dialogue.
Most of the settings in terms of putting together a node are the same for NPCs and PCs, there are some differences regarding animations and lip synching.
Conversation Editor - Actions Node
In this next image, you will see the actions tab for a particular node, on the actions tab you can add scripts or scripts and parameters that will fire when the node is reached in a conversation. Multiple actions can be added to each node.
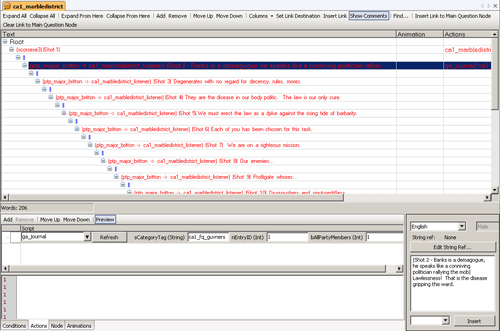
NPC Blocking
A particular use of the action node is for a blocking script, that will have a single parameter that will be passed through a switch. Each numbered case in the blocking script will correspond to a particular line in the conversation, and will contain the scripted actions that you want your NPCs to take during that line.
Conversation Editor - Conditions Node
In the next image, you will see the conditions tab. The conditions tab is used to check for conditions before using the node in the active conversation. Like the actions tab, multiple conditions can be added to each node.
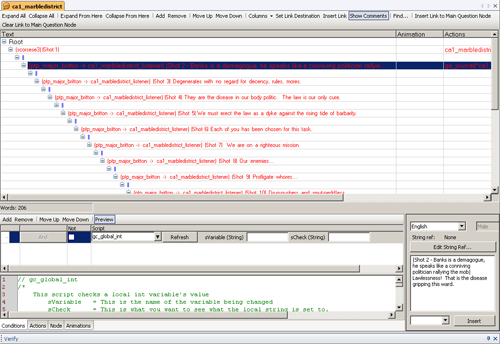
In the above image, the gc_global_int script is used, with the first parameter being the name of the int, and the second parameter being the string that will be converted to the value to compare against.
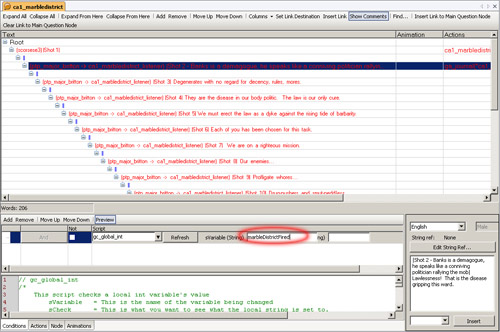
In the above image, the name of the global int checked is "marbleDistrictFired"
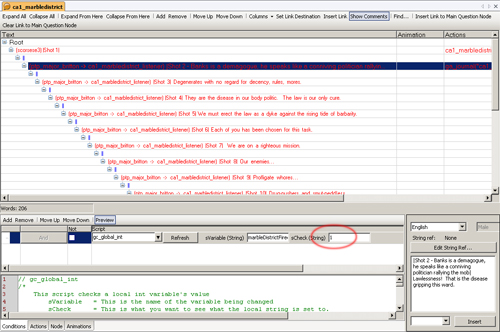
In the above image, the value we check against is "1". Other values can be used, such as ">4" or "!=3" etc.
Conversation Editor - Node Tab
The node tab in the conversation editor is for:
1) Setting up the NPC's animations
2) Setting a delay on the node
3) Establishing who the speaker and listeners are for a given node
4) Setting up what, if any, static or user defined cameras to use
6) Linking a sound file to the node
7) Lip synch
8) Inserting a .tga image into the cutscene
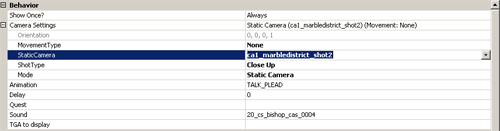
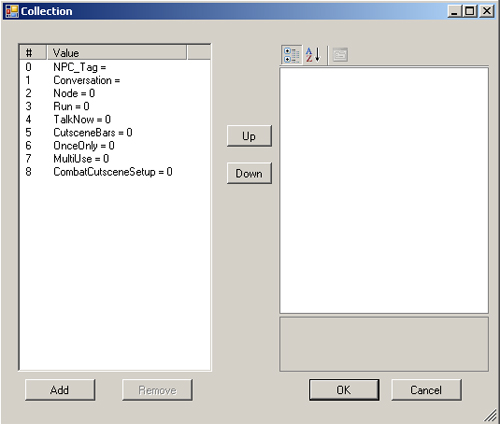
In the following image, you'll see the node tab:
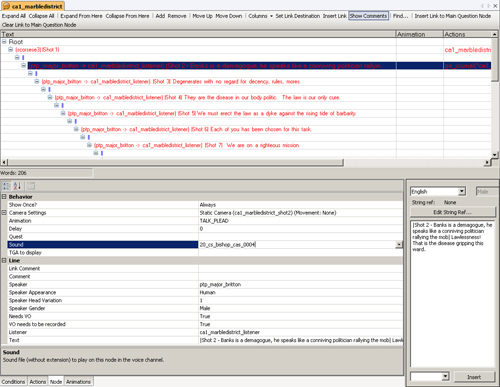
In the top half of the node tab you see:
1) Show Once - This setting determines if the node will show once per game, once per creature, once per conversation or always. You can make things as complex as you want with these settings, but if you are using some means of determining whether the cutscene will fire, such as checking a local int on the area, then you can leave these set to "always"
2) Camera Settings - The camera settings are detailed below
3) Delay - This is the delay in terms of how long the player has to wait until they can click past the current line of the cutscene
4) Quest - Linking to a journal
5) TGA To Display - You can display a targa file in the context of the cutscene (See the Act 1/2/3 images in the OC for an example of use)
In this next image, the camera settings field has been expanded:
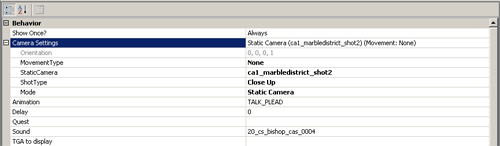
In the camera settings you will find:
1) Orientation - Does not appear to be adjustable as of the 1.03
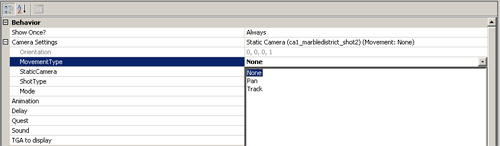
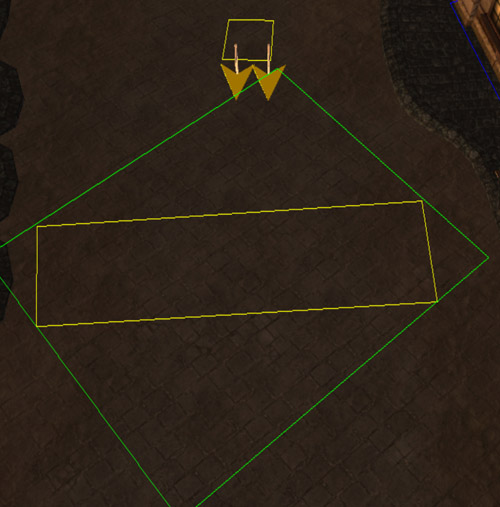
2) Movement Type - None, Track and Pan.
Tracking is when a camera moves in the same direction as the speaker, focused on the speaker, and without any change in angle (pitch/yaw/roll).
Panning is when the camera stays stationary and changes pitch (around Z) to follow a moving speaker.
See image for reference:
3) Static Camera - This is the field where you input the tag of your static camera, if you are using one.
See image for reference:
4) Shot Type -
Some are self-explanatory.
Behind the Head
Close up
Establishing - a wide shot that will clearly establish where the speaker is in the environment
Long - More narrow than a wide shot
Medium - More narrow still, probably pretty close to a two-shot in scope, but centered on the speaker, as opposed to on the axis between the speaker and the listener
Over the Shoulder - Abbreviated OTS sometimes
Side - Side view of the speaker
3/4 - Most of the speaker's body in shot
Top Down - self explanatory
Torso - Just the speaker's torso
Two shot - The speaker and the listener in the same shot
Walk-by - The camera will track quickly past the speaker as they talk
Worm's Eye - Ultra low angle shot from the ground up
See image for reference:

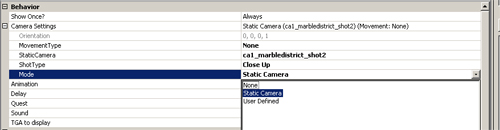
5) Mode - Camera mode is either random, user defined or static camera.
Random will randomly use one of the Shot Types listed above.
User defined will use whichever shot type you select from the list, along with any movement type.
Static Camera will use whichever static camera is referenced in the Static Camera tag field up above.
See image for reference:
Conversation Editor - Node - Animations Drop Down List
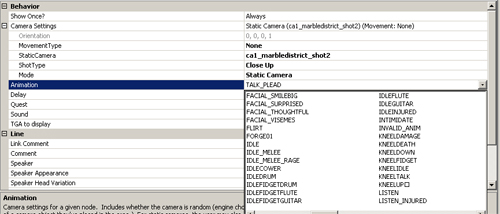
The drop down animations list has a long list of all of the animations available for all models. Some of the models do not have all of the animations.
FACIAL_XXXX animations will break lip synching.
TALK_XXXX animations are the general talking animations.
The other animations can be used, some with good effect, it just takes playing around with them.
Firing Your Cutscene
You can find a template of the OEI script below listed under the Templates Tab in your script editor. (The tab only seems to load the templates the first time you open a new script in the toolset right now).
The script is for the on_client_enter event of the area in which the cutscene occurs. You set your speaker's tag and the name of your conversation where indicated. You can use an int on the area of the cutscene to condition the thing to happen only once. Alternatively, there are a million ways to handle how many times/under what conditions the cutscene happens.
// Area OnClientEnter Cutscene.nss
/*
Area OnClientEnter event handler template. Setup cutscene(s) to fire when the party enters a new area.
This script will execute after a group area transition using JumpPartyToArea().
bCutsceneCondition will determine if a cutscene should play, but each cutscene is restricted to play only once.
HOW TO SETUP A CUTSCENE:
0. Copy and paste script block into "CLIENT ENTER CUTSCENES"
1. Specify a title for your cutscene
2. Replace (FALSE) with condition to play cutscene
3. Specify Speaker and Dialog of conversation
4. Add additional cutscene scripting
// Cutscene: 1. Example Title
if (GetIsCutscenePending(stCI) == FALSE)
{
bCutsceneCondition = (FALSE); // 2. Replace (FALSE) with condition to play
sSpeakerTag = ""; // 3. Specify Speaker and Dialog
sDialogName = "";
stCI = SetupCutsceneInfo(stCI, sSpeakerTag, oPC, sDialogName, bCutsceneCondition);
if (GetIsCutscenePending(stCI) == TRUE)
{
// 4. Additional cutscene setup
}
}
*/
// BMA-OEI 2/3/06
// BMA-OEI 2/7/06 added speaker == PC check
// ChazM 2/7/06 modified implementation
// ChazM 2/7/06 moved funcs to ginc_cutscene
// BMA-OEI 2/7/06 support multiple cutscenes
// BMA-OEI 2/7/06 revert original controlled char
// BMA-OEI 2/8/06 added comments, Group Area Transition restriction
#include "ginc_cutscene"
int StartingConditional()
{
// Do not execute if OnClientEnter was not fired from a group area transition
if (FiredFromPartyTransition() == FALSE) return (FALSE);
// Get party leader, force control of owned PC
object oPC = GetFirstEnteringPC();
object oLeader = GetFactionLeader(oPC);
oPC = SetOwnersControlledCompanion(oLeader);
// Initialize temp CutsceneInfo
struct CutsceneInfo stCI;
stCI = ResetCutsceneInfo(stCI);
int bCutsceneCondition;
string sSpeakerTag;
string sDialogName;
// *** START CLIENT ENTER CUTSCENES ***
// Cutscene: 1. Example Title
if (GetIsCutscenePending(stCI) == FALSE)
{
//local int named bDone is checked from the area you enter, returns false, then run the cutscene
//the return of bDone is passed as a parameter to SetupCutsceneInfo() which is defined in ginc_cutscene
bCutsceneCondition = (GetLocalInt(OBJECT_SELF, "bDone")==FALSE); // 2. Replace (FALSE) with condition to play
sSpeakerTag = "scorsese3"; // 3. Specify Speaker and Dialog
sDialogName = "ca1_marbledistrict"; //Speaker doesn't have to be any of the NPCs talking
//in the cutscene, just a valid object for running a convo
stCI = SetupCutsceneInfo(stCI, sSpeakerTag, oPC, sDialogName, bCutsceneCondition);
if (GetIsCutscenePending(stCI) == TRUE)
{
SetLocalInt(OBJECT_SELF, "bDone",TRUE);// 4. Additional cutscene setup
}//
}
// *** END CLIENT ENTER CUTSCENES ***
// Cue cutscene or revert control to original character
if (GetIsCutscenePending(stCI) == TRUE)
{
FireAndForgetConversation(stCI.oSpeaker, oPC, stCI.sDialog);
}
else
{
SetOwnersControlledCompanion(oPC, oLeader);
}
// If cutscene is pending, fade to black
return GetIsCutscenePending(stCI);
} |
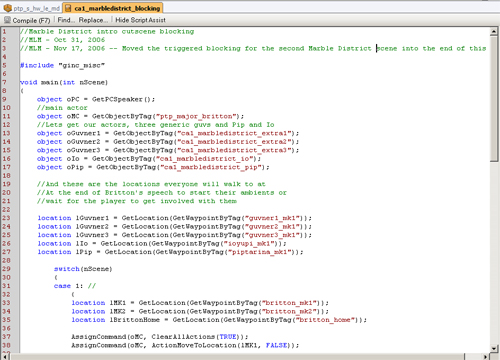
For reference, an image of the script in the script editor:

NPC Blocking Scripts and Other Stuff
In addition, you probably want a blocking script, as mentioned up above.
A blocking script is simply a switch/case statement with each case numbered according to node.
//We add the parameter to main up top
void main (int nScene)
{
//Here We would define anything we want to be usable
//in all of the cases
switch (nScene)
{
//nScene will be the parameter of this script on the action tab of
//the nodes in your cutscene
case 1:
{
object oDoor4 = GetObjectByTag("door_dcc_4");
AssignCommand(oDoor4, ActionOpenDoor(oDoor4));
}
break;
case 2:
{
object oDoor2 = GetObjectByTag("door_dcc_2");
AssignCommand(oDoor2, ActionOpenDoor(oDoor2));
}
break;
case 3:
{
object oDoor3 = GetObjectByTag("door_dcc_3");
AssignCommand(oDoor3, ActionOpenDoor(oDoor3));
}
break;
}
} |
You put your scripted actions into the case for a particular node and pass the node # to the blocking script on the actions tab as the parameter of the script.
To add the parameter of int nScene, just type out void main (int nScene) at the top instead of just void main().
The kinds of things that you can do in the blocking script are pretty much limitless, but include things like NPCs walking from waypoint to waypoint during their conversations, playing different animations in different ways than are feasible with the simple animations assignments in the conversation editor, opening, closing, unlocking doors, spawning in creatures, etc. etc.
Example of a blocking script in the editor:
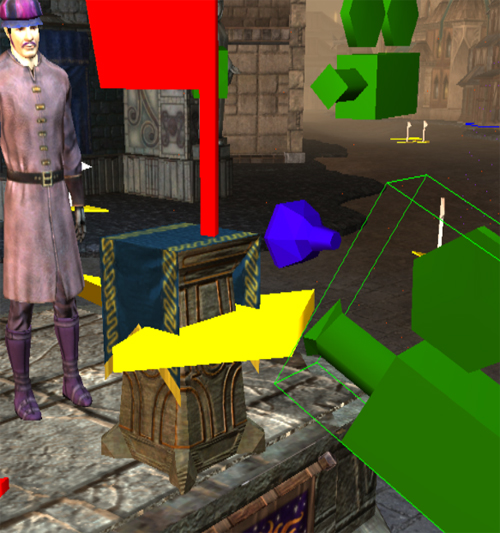
I-Points
This is an i-point:
An i-point is a misc placeable that is useful as an artificial speaker or listener on a given node.
Speak Triggers
Instead of using an on_client_enter script to startup your cutscene, you can use a speak trigger.
Static Cameras
To place a static camera, all you need to do is select the one in the palette and place it in your area. Retag the static camera something easy and descriptive, like "myfirstscene_shot1_establishing"
Static Camera Attitude
Adjusting the pitch, yaw and roll of your static cameras:
Camera Yaw
Select+shift+mouse movement left or right = yaw of the camera
Yaw is rotation around the Z-Axis, and the standard way you rotate placeables as well.
Camera Roll
Select+shift+ctrl+mouse movementleft or right = roll of the camera
Roll is rotation around the X-axis.
Camera Pitch
Select+shift+alt+mouse movement up and down = pitch of the camera
Pitch is rotation around the Y-axis. |
|
|
 |
|
Affiliated Sites
|
|